Masterclass: an autumn card using the "iris folding" technique

November is my most disliked month of the year. I think, November is always so somber, depressive and grey. You can hardly ever see the sun, only rain, wind and cold. Therefore, November needs a bit of colours. This is why I decided to make a colourful autumn card. Besides, the Father's Day was celebrated in Finland recently, so it seemed to me a good idea.

A couple of weeks ago I learned about a technique called iris folding. This is a paper craft technique which involves folding coloured paper strips in order to make a design. The center of the design reminds of the iris diaphragm of a camera lens, hence the name.

The shape where you fold the paper strips may be different. I saw a lot of different variations: from hearts to heel shoes, from Christmas trees to houses. But as it is autumn now, I chose the maple leaf. I really like the tree and the shape of its leaves, so I decided to try out the technique on the maple leaf. So, let's get started!

What do you need?

1. Two sheets of coloured card stock.

2. Thin scrapbooking paper or simple coloured paper of 3 different colours/designs.

3. Scotch tape and double-sided tape or glue.

4. Stationery knife or scissors.

5. Cutting mat. 

6. The pattern.

7. Paper cutter.

The making of the card

At first, take one sheet of a coloured card stock and cut out a square. This is going to be the base for the design. I used the card stock of pale beige colour. I cut the square 14*14 cm using my paper cutter. The paper cutter is my best assistant, you can cut the paper very fast with it.

The pattern

Then take the pattern of the maple leaf and put it on the center of the card stock. Make sure you put it on the back side of the card. Then draw the leaf with a pencil. I recommend you to check twice whether you put it on the right side of the card stock, for I finally made a mistake and had to colour the edge of the leaf with a gel pen of a golden colour to hide the marks of the pencil.

I found the pattern on some blog. I could download it for free. Here is the link for the pattern. I recommend you to print two copies: one to cut and use as a template and the other to use as a pattern.

The drawn maple leaf

Then carefully cut the maple leaf out from the inside of the card stock without damaging it. There should be a hole in the shape of the leaf in the center of the card stock. This is the base for the design. As I took a really thick card stock, I decided to use the stationery knife. I used it for the first time. You must remember that it is really sharp, therefore you have to be very careful when you work with it. Make sure, you don't rush. I also recommend you to use the cutting mat not to damage the table surface. Personally I used a clean and dry plastic chopping board instead.

The cut leaf

After having cut the maple leaf, put it aside. I recommend you not to throw it away if it wasn't damaged, for you may use it in some other work. Now take the card stock with the leaf hole in the center and place it on the pattern so the pattern is seen from the hole. Carefully tape the card stock to the pattern sheet so it doesn't move. 

The card stock is taped from the back side.

After having taped the card stock, take the scrapbooking paper or colourful paper and cut it in strips about 3 cm wide. Personally I decided to use the Ebru paper. Ebru is a method for paper marbling. It is the eastern tradition of painting on water. I have never tried the paper marbling, but I saw what can be made by using this method. I got the Ebru paper from my friend Anna Kervinen, she organizes the Ebru masterclasses in Helsinki. For the card I needed three different patterns.

Ebru paper

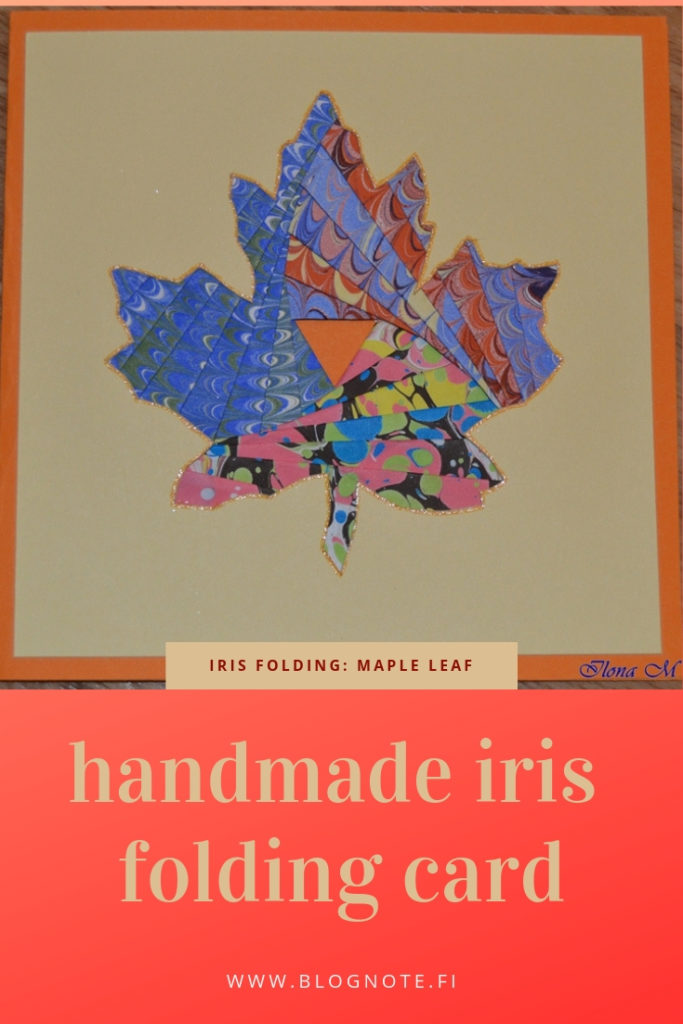
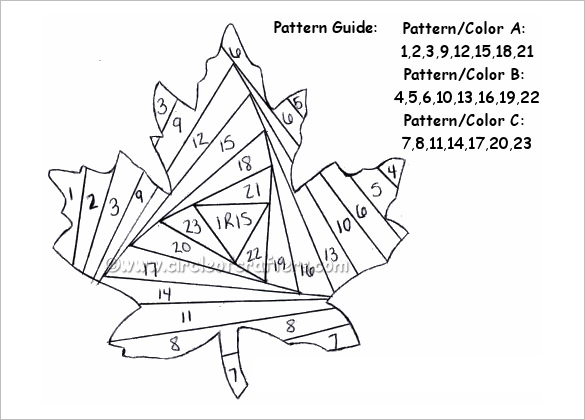
The pattern shows the strips with numbers on each strip. Before getting started, decide, what colour will go for the colour A, colour B and colour C. Thus, you will need colour A for the strips 1, 2, 3, 9, 12, 15, 18 and 21; colour B for the strips 4, 5, 6, 10, 13, 16, 19, 22 and colour C for - 7, 8, 11, 14, 17, 20 and 23 (look at the photo of the pattern).

Fold every strip in half. Tape every strip to the card stock into the hole according to the pattern. The best is to use the ordinary transparent adhesive tape, I used the painters tape which was definitely not the best option. Trim the too long strips as you go.

The folded strips are being taped in order.

Begin with the number 1 and then continue in order, not forgetting to change the colour or the design of the paper according to the pattern.

Two colours are taped, next one comes the third.

As you go on, you will notice the hole becomes smaller. You can see it on the picture below.

The hole is getting smaller.

When all the strips will be taped, there will remain a small triangle in the center. Then peel the card stock off the pattern sheet, flip the card stock and see what you got.

The iris diaphragm of paper is done.

In conclusion, take the other card stock (I took orange). Cut out the base for the card, so you can tape the card stock with design on it. As I wanted my card to open, I cut out a rectangle 30*15 cm and folded it in half. Then I taped the card with "iris folding" on the base by using double-sided tape, for I don't like glue. This is it! The card is ready! :)

I hope I explained well the technique "iris folding" and that you will try it on your own. It's not difficult and doesn't need too much time. The amount of the used materials is small and the result is very pleasant.

In current work I used the ready pattern that I found on the internet, but I'd like to draw my own, using the templates I have in my storages. When I will do it, I will certainly show you the results.

Did you know about "iris folding" before? 

14 comments
  1. Илона, как красиво! Не знала про такую технику! Захотелось попробовать, ты так подробно все объяснила! Действительно, зажимаем ноябрь! Рукоделием по хмурости:)

    1. Спасибо! Мне самой очень понравилась эта техника. 🙂

  2. Илона, о такой технике не знала, спасибо за рассказ. Мне думается, что такая техника идеально подойдет для новогодней открытки

    1. Я сама эту технику открыла для себя несколько недель назад. Эта техника подходит абсолютно для любой открытки, для новогодней в том числе, всё зависит от формы, которую вырезаешь в картоне.

  3. Какая красота! Сколько же труда и терпения нужно, чтобы её сделать!:)

    1. Спасибо! 🙂 Ой, её совсем не сложно было делать. 🙂 Всё очень быстро и легко делается. 🙂

  4. Илона, интересная техника, и МК очень понятный и детальный! Возьму себе на заметку, спасибо! 🙂

    1. Очень рада, что всё оказалось понятно. 🙂 А техника, в самом деле, очень интересная. Обязательно сделаю ещё что-нибудь. 🙂

  5. Фантастически получилось!

    1. Спасибо! Я получила шаблон с ёлочкой, хочу теперь рождественскую открытку сделать в этой же технике. 🙂

  6. Вау) хочу попробовать.

    1. Обязательно попробуйте! Техника не сложная, делается быстро, а результат очень красив. 🙂

  7. Очень необычная открытка получилась!

    1. Спасибо! 🙂

Comment

Your e-mail address will not be published. Required fields are marked *